After setting up my Bambu Lab P2S last week, I set about doing what anyone does with a new toy: thoroughly testing it out.After printing the usual poop-chutes and toolboxes, I recalled something I added to my printing list roughly six months ago.I had no idea it would print so well.
I 3D printed a lens step-up ring Means to an end Back in November of last year, I wrote about shooting infrared photos with an iPhone.For this experiment, I went and purchased a 52mm HOYA 720nm infrared filter to manually hold against my iPhone 17 Pro’s rear lens array.The results are truly impressive, owing to the smartphone’s seemingly weak hot mirror filter that helps to reject infrared light to improve overall camera performance.
I had a choice of filter size, with very little in the way of price difference between the 52mm, 58mm, or even 62mm options at the time.I settled on 52mm because I have a very old Nikon D50, which is often cited as being another good candidate for unmodified infrared photography for a similar reason as modern smartphones.Most infrared photographers shoot either on film that is sensitive to infrared light or on modified cameras that have been converted specifically for this purpose.
Using a filter with an unmodified camera is unorthodox in that it requires long exposure times, but it’s fun nevertheless.While I’m still perfecting my technique of shooting IR photos with the D50, I was keen to give the same technique a try on my modern Sony mirrorless.I figured the electronic viewfinder and live view LCD would make it easier to frame my shots, with modern features like focus peaking at my disposal to help me avoid blurry exposures.
The only problem is that the lens I want to use takes 49mm filters.Right before I bought the filter, I did some cursory research and decided that I’d try 3D printing something if I ever wanted to adapt the filter for another camera system.I never expected the end result to turn out so well.
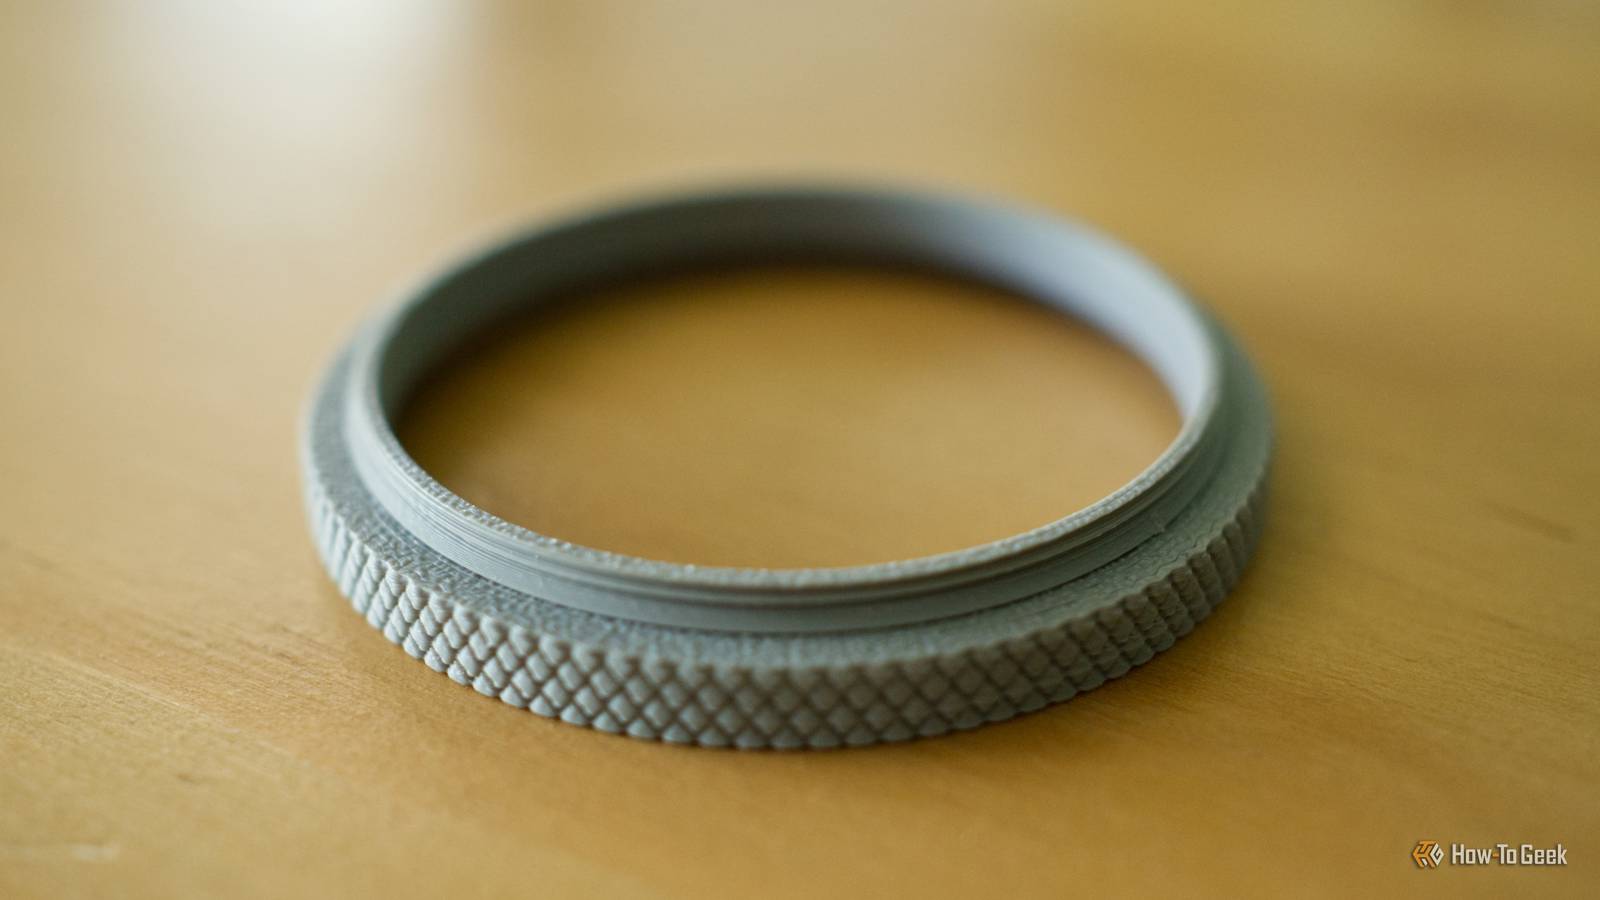
A slow, cheap, and intricate print Relative precision required The model I used was a step-up ring filter adapter by MakerWorld user M3 Makes.The model is available in a huge number of variations, for just about any filter you could hope to adapt.The author even takes requests and updates the listing with new models.
Each ring prints in two parts, which screw together easily, avoiding the need for supports and providing a cleaner overall design.For the 49mm-52mm variant, just over 3g of filament is needed.The model is highly detailed, since the threads are necessary to attach both parts, the lens, and the filter.
I used Bambu PLA basic to print this model, which works out to around 6 cents if you pay full price for your filament.The model itself took around 50 minutes to print on account of the attention to detail that is necessary.My P2S is in “stock” condition, with the pack-in 0.4mm nozzle.
I set my expectations low, since I’m aware of how small the thread is on these things and how fiddly they can be to attach without adapters.I didn’t expect a flawless print, but that’s what I got.It works absolutely flawlessly, and I now regret passing up all the cheap thrift store filters I’ve seen over the years.
Quiz 8 Questions · Test Your Knowledge3D Printing TechnologyFrom garage prototypes to printed organs — test how much you really know about the layer-by-layer revolution reshaping our world.HistoryMaterialsMedicineIndustryFuture TechBegin 01 / 8HistoryWho is widely credited with inventing stereolithography (SLA), the first commercially viable 3D printing technology?AScott CrumpBHans LangerCChuck HullDCarl DeckardCorrect! Chuck Hull invented stereolithography in 1983 and co-founded 3D Systems to commercialize it.He filed the patent in 1984, laying the groundwork for the entire 3D printing industry as we know it today.Not quite — the answer is Chuck Hull.While Scott Crump invented FDM (fused deposition modeling) and Carl Deckard developed SLS (selective laser sintering), it was Hull who pioneered stereolithography and effectively launched the commercial 3D printing era.Continue 02 / 8HistoryIn what decade was the term 'additive manufacturing' first officially standardized by ASTM International?A1990sB2000sC2010sD1980sCorrect! ASTM International formally standardized the term 'additive manufacturing' in 2009 and published comprehensive standards in the early 2010s.
This helped unify the industry under a single technical definition covering all layer-based fabrication methods.Not quite — the standardization happened in the 2010s.Although additive manufacturing processes existed since the 1980s, ASTM International didn't formalize the terminology and technical standards until around 2009–2012, giving the industry a common language for the first time.Continue 03 / 8MaterialsWhich material is most commonly used in consumer-grade FDM (Fused Deposition Modeling) 3D printers?AABS (Acrylonitrile Butadiene Styrene)BPLA (Polylactic Acid)CPETG (Polyethylene Terephthalate Glycol)DNylonCorrect! PLA is the most popular material for hobbyist and consumer FDM printers because it's easy to print, biodegradable, and derived from renewable sources like cornstarch.Its low warping tendency makes it beginner-friendly compared to alternatives like ABS.Not quite — PLA is the correct answer.
While ABS was once dominant, PLA has overtaken it in the consumer space due to its ease of use, lower print temperature, and eco-friendly origins.ABS remains popular in industrial settings where heat resistance matters more.Continue 04 / 8IndustryWhich aerospace company famously used 3D printing to manufacture the fuel nozzle for its LEAP jet engine, reducing part count dramatically?ARolls-RoyceBPratt & WhitneyCGE AviationDHoneywell AerospaceCorrect! GE Aviation used metal 3D printing to produce the LEAP engine's fuel nozzle, consolidating what was previously 20 separate parts into a single printed component.The nozzle is five times more durable and 25% lighter than its predecessor, making it a landmark industrial achievement.Not quite — it was GE Aviation.
Their 3D-printed LEAP fuel nozzle became one of the most celebrated examples of additive manufacturing in industry.By collapsing 20 parts into one, GE demonstrated that 3D printing could deliver real performance advantages, not just prototypes.Continue 05 / 8MedicineWhat is the term for the 3D printing process used to fabricate living tissue and organ structures using biological materials?ABiofabricationBBioprintingCBioformingDOrganogenesis printingCorrect! Bioprinting uses modified 3D printers loaded with bioinks — mixtures of living cells and hydrogels — to construct tissue structures layer by layer.Researchers have already bioprinted skin, cartilage, and simple vascular structures, with full organ printing remaining an ambitious frontier goal.Not quite — the correct term is bioprinting.
While biofabrication is a broader field that includes bioprinting, the specific process of layer-by-layer fabrication using cell-laden bioinks is called bioprinting.It's one of the most exciting medical frontiers, with potential to one day eliminate organ transplant waiting lists.Continue 06 / 8IndustryWhat major limitation of most consumer FDM 3D printers makes them unsuitable for printing functional metal parts directly?AThey cannot achieve the temperatures needed to melt most metalsBMetal filament clogs the extruder permanentlyCMetal objects printed with FDM have no structural integrityDConsumer printers lack the resolution for metal detailCorrect! Most metals require temperatures well above 1000°C to melt, far beyond the 200–300°C range of standard FDM hot ends.Industrial metal 3D printing uses processes like DMLS (Direct Metal Laser Sintering) or EBM (Electron Beam Melting), which use high-powered lasers or electron beams to fuse metal powder.Not quite — the core issue is temperature.
Consumer FDM printers top out around 300°C, while most structural metals melt well above 1000°C.Metal-infused filaments exist but they contain metal powder in a plastic binder, producing decorative rather than truly functional metal parts.Continue 07 / 8Future TechWhich emerging 3D printing technology can fabricate objects in seconds by projecting light into a resin vat, rather than printing layer by layer?AContinuous Liquid Interface Production (CLIP)BVolumetric printingCMulti-jet fusionDBinder jettingCorrect! Volumetric printing, pioneered by researchers at UC Berkeley and Lawrence Livermore, projects computed tomography-style light patterns into a rotating resin vat to solidify an entire 3D object simultaneously.It's dramatically faster than layer-based methods and can even print around pre-existing objects.Not quite — the answer is volumetric printing.
While CLIP (developed by Carbon3D) does eliminate discrete layers using oxygen-permeable membranes for speed, it still builds objects progressively.Volumetric printing is the technology that truly breaks the layer-by-layer paradigm by solidifying an entire shape at once.Continue 08 / 8HistoryThe RepRap project, launched in 2005, was significant to 3D printing history primarily because of what key innovation?AIt introduced the first color 3D printerBIt created the first open-source, self-replicating 3D printerCIt developed the first metal-compatible consumer printerDIt was the first printer to use PLA filamentCorrect! The RepRap (Replicating Rapid Prototyper) project, led by Dr.Adrian Bowyer at the University of Bath, aimed to create an open-source printer that could print most of its own parts.
This philosophy sparked the DIY 3D printing revolution and directly led to affordable consumer printers like the early Makerbot and Prusa machines.Not quite — RepRap's big contribution was being open-source and self-replicating.By releasing designs freely and building a machine that could reproduce itself, Adrian Bowyer's project democratized 3D printing.It seeded an entire ecosystem of affordable printers and passionate maker communities that transformed the technology from industrial to personal.See My Score Challenge CompleteYour Score/ 8Thanks for playing!Try Again A cost saving of 16650% No kidding Assuming we don’t factor in the cost of a $550 3D printer, the cost savings here are wild.
You could also print this on something far cheaper, like an entry-level Bambu Lab A1 Mini ($299 new, cheaper second-hand).Though I’m not averse to spending $10 on an adapter, I’m not one to pass on an opportunity to save some money either.The going rate for this sort of adapter is around the $10 mark, with shipping.
As an impatient soul, I’d probably pick it up from a local camera shop and pay a little more.While I can’t 3D print the filters, I feel a lot more comfortable investing in more kit knowing that I can adapt between lens and camera systems.Just as step-up models exist (for attaching larger filters to smaller lenses), so too do step-down models, which go the other direction.
Now I’m thinking about filter adapters for the iPhone, to do away with having to hand-hold the filter during IR photo sessions.Not only do many such models already exist, but this might be the perfect opportunity to design something from scratch to fit my existing case.Bambu Labs A1 mini 3D Printer Build Volume 180x180x180 Printing Speed 500mm/s The Bambu Lab A1 mini 3D printer is ready to go out of the box and can have you printing within 30 minutes.
Offering full-auto calibration, this compact 3D printer features a 180mm build volume and is compatible with the AMS Lite for multi-color printing.It also features built-in vibration and flow-rate calibration, which are typically features only found on more premium printers.$299 at Bambu Lab Expand Collapse Bambu Lab P2S Build Volume 256x256x256mm Printing Speed 600mm/s The Bambu Labs P2S 3D printer is ready to go out of the box and can have you printing within 15 minutes.
It features up to 20-color printing with the AMS unit, has an upgraded built-in camera for remote monitoring and time lapses, and has an enclosed body for printing even high-temperature filament.$549 at Bambu Lab Expand Collapse Take your hobbies to the next level Photography is one hobby that can benefit from 3D printing, but there are many more.Here are seven more pastimes that can benefit from a 3D printer.
Read More