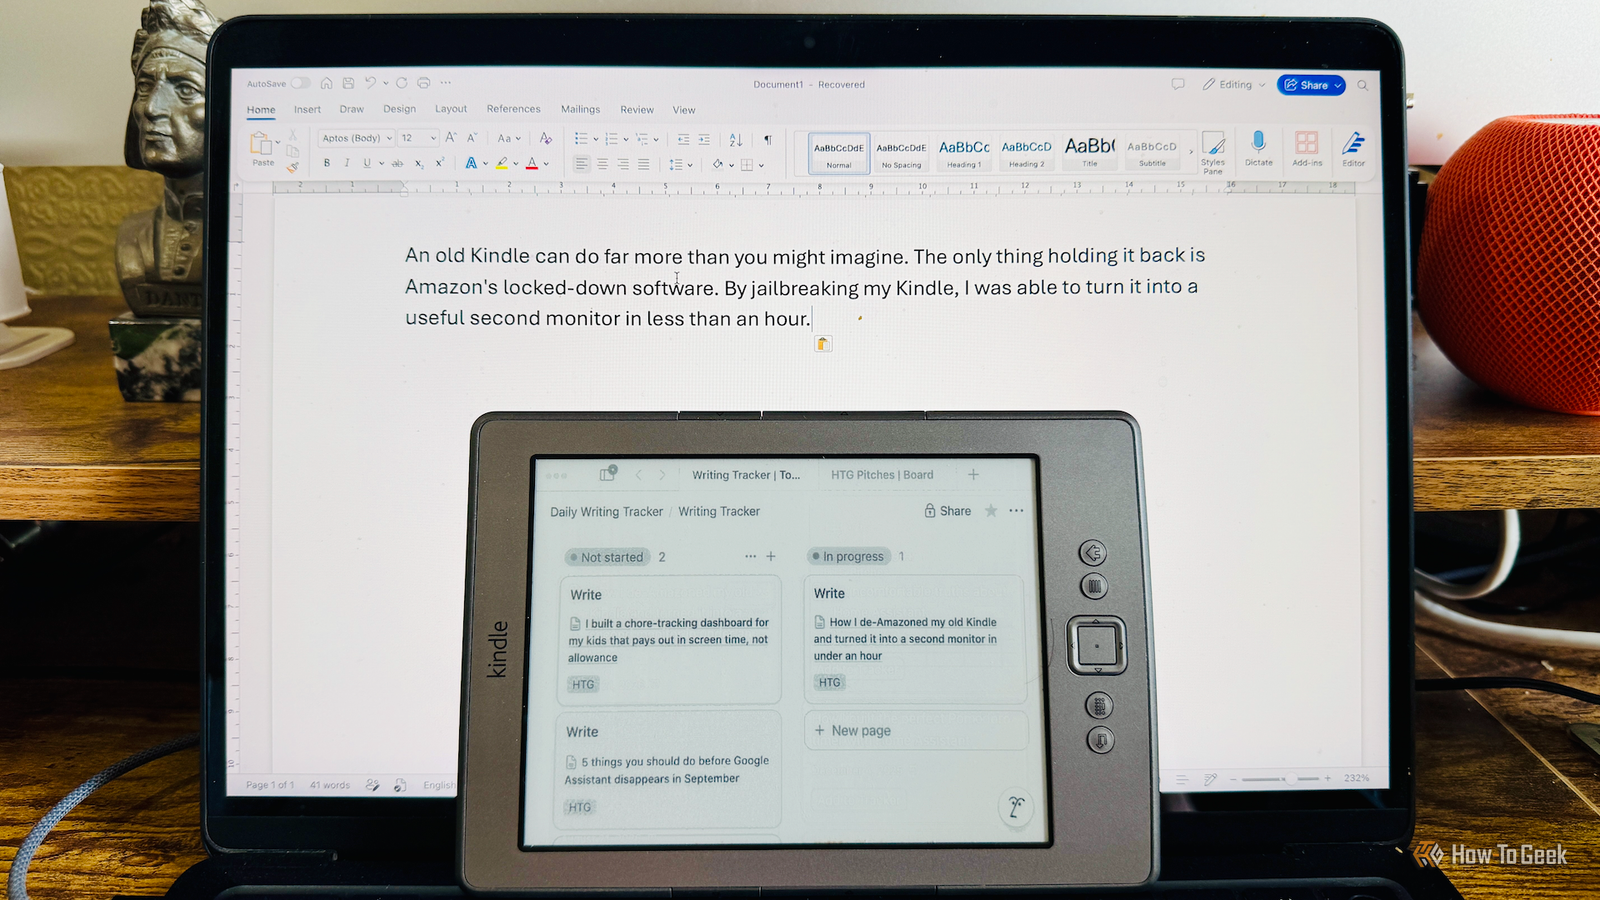
An old Kindle can do far more than you might imagine.The only thing holding it back is Amazon's locked-down software.By jailbreaking my Kindle, I was able to turn it into a useful second monitor in less than an hour.
You need to jailbreak your Kindle to escape Amazon's restrictions The method will depend on your Kindle model In order to be able to do almost anything interesting with your Kindle outside of reading books, you need to jailbreak it.Jailbreaking your Kindle doesn't mean you want to start reading a ton of pirated books; it just allows you to gain root access to the Kindle so that you can run your own code on a Kindle that you bought and paid for.A Kindle is heavily locked down, so jailbreaking it is the only way to be able to modify it in any meaningful way.
There are risks with jailbreaking: you may lose data or even brick your Kindle, and if you damage your Kindle by jailbreaking it, it may not be covered by your warranty.Older Kindles have more mature jailbreaking support and are less costly to replace.Amazon has stopped supporting my old Kindle 4, so there was nothing holding me back from doing it.
The exact method for jailbreaking your Kindle will depend on the model.For some Kindle models and firmware versions, the process may only take a few minutes, but some methods are more involved.Related 8 Cool Things You Can Do With a Jailbroken Kindle Break free from Amazon's walled garden.
Posts 1 By Andy Betts Turning a specific window into a live feed A script grabs an image of the window every half a second Once I'd jailbroken my Kindle, I wanted to set it up as a second monitor.My MacBook Air doesn't have the hugest screen, so even the relatively small screen of the Kindle would add some useful extra space.What I really wanted was a way to display a specific window from my Mac while I worked in other windows.
I use Notion to track my work assignments, so I wanted a way to display Notion on the Kindle screen while I got on with writing on the Mac.I increased the zoom on the Notion window so that the text would be big enough to read on the smaller Kindle screen.I created a script that uses screencapture, a small command-line tool that's built into every Mac that can capture an image of the screen.
By default, it captures the whole screen, but you can get it to capture a specific window using the ID of that window.It will capture an image of the window even if that window is covered by other windows.The tricky part was getting the ID for the Notion window because these IDs aren't permanent.
I had to add some code to my script that uses a system-level framework called Quartz to ask the Mac for a list of every currently open window, find the Notion window, and extract its current ID.Using screencapture, the script grabs an image of the Notion window every half a second.Using the free ImageMagick command-line tool, the script rotates the image so it will display correctly on the Kindle in landscape view, shrinks it to the Kindle's resolution, and converts it to grayscale.
The image is then dropped into a folder, and a simple web server makes the current image available to anything that asks for it on the local network.Getting the images to display on the Kindle A loop grabs the latest image and draws it on the screen By capturing an image of my Notion window every half a second, the job was half complete.The second part was to get these images onto the Kindle and display them on the screen.
A script running in a loop on the Kindle uses wget to download the images.This is a common command-line tool for downloading files from a web address, so by pointing it at the small web server running on the Mac, the Kindle can get each new image of the Notion window from the Mac.By default, wget won't overwrite a file that already exists; instead, it saves the new download with a different filename, so each image is deleted from the Kindle just before Wget grabs the next one.
The script then uses the eips tool built into the Kindle firmware to draw each image onto the Kindle's screen.Every time eips is used to draw an image, it replaces the previous image on the screen.This means that the image updates roughly once per second, reflecting the Mac's Notion window with a small delay.
I effectively end up with the Kindle as a second monitor showing only the Notion app.I can work on other apps on my Mac, and the Kindle will keep displaying Notion.Making it a one-click daily tool KUAL starts the Kindle side, Raycast starts the Mac side Close The final stage was to make the Notion monitor easy to start and stop.
I didn't want my Mac to be constantly taking snapshots of Notion when I wasn't using the Kindle monitor.Starting and stopping the Kindle side involved using the Kindle Unified Application Launcher (KUAL), which was the first thing I installed after jailbreaking my Kindle.This is a launcher that lets you open other apps, such as KOReader.
I added two menu items in KUAL; one starts the script that fetches the Notion images, and the other stops it.This allows me to start and stop the monitor on the Kindle.On the Mac side, I used the excellent Raycast app.
This is a powerful launcher app that can replace Spotlight on your Mac.It supports script commands, so I was able to set up a Raycast command to start the screen capture and web server, and another to stop it again.I can now start and stop the Kindle monitor whenever I want.
Your Kindle can do more than you think Using my Kindle this way is genuinely useful.I can keep my Notion screen visible while I work, and if I want to navigate around Notion, I just bring the window to the front on my Mac and navigate as normal.It's given me more screen real estate for less than an hour's work.
Read More