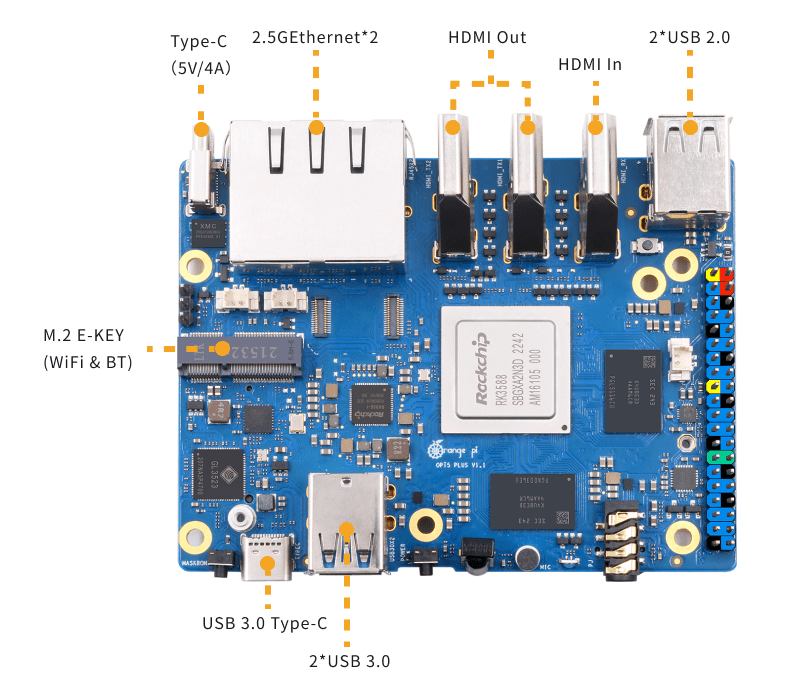
When I say 16GB, I mean 16GB of RAM.In the world of single-board computers (SBCs), it isn’t unusual to focus on the Raspberry Pi as probably the most well known SBC but in some ways, the Orange Pi Plus stands out as a compelling choice for hobbyists and makers.Orange Pi 5 Plus provides abundant interfaces, including two HDMl output ports, one HDMl input port , two PCIe extended 2.5G Ethernet ports, an M.2 M-Key slot that supports installation of NVMe SSDs, and an M.2 E-Key slot that supports Wi-Fi6/BT modules.
In addition, Orange Pi 5 Plus has two USB 3.0, two USB 2.0, and two Type-C (one of which is a power connector).There are many blog entries out there describing the Orange Pi Plus so I won’t re-invent the wheel (and please don’t confuse this model with the original Orange Pi models).In essense, the Orange Pi 5 Plus boasts a powerful Rockchip RK3588 processor.
This 8-core 64-bit processor delivers smooth performance for various tasks, from browsing the web to running demanding applications.But processing power isn’t the whole story.The 16GB LPDDR4 RAM in the Plus version is a major highlight.
This apparently allows for seamless multitasking, handling complex applications, and working with large datasets efficiently.I was drawn to trying out this board because of the large amount of RAM.You can add an eMMC onboard or use an SD.
I have connected an SSD with USB3 adaptor and that works just fine – not yet tried booting from the SSD but for my first steps, as I’m familiar with Raspberry Pi including the latest BOOKWORM version of Pi OS, I thought I’d start there.So, off I went to the ARMBIAN site to grab the latest Armbian Bookworm Debian for the Orange Pi Plus.Lots of options on this site – I went for this – the basic minimal Bookworm command line version.
On my PC I took a 32GB (chosen for price-point, not need) microSD and put it in a USB adaptor, loaded up Balena Etcher on my PC.Once I’d inserted the SD/USB combo into my PC, I selected the Debian Bookworm image above which I’d downloaded, selected the relevant USB and told Etcher to flash.5 minutes later I had 64-bit Bookworm ready to insert into the Orange Pi Plus.
I did that, inserted an Ethernet cable into the RPI5+ and turned on the board – no monitor, just a 3A 5v PSU I had handy.A red light came up on the OP5+ followed by a flashing blue light.I was un-necessarily concerned by the latter though sittign here hours later with a working OP+ it seems still to be flashing – but perhaps green now.
Using Advance IP Scanner – a free tool I’ve used for years on the PC, I noticed after a minute or so, the OP5+ appear on my network.Next, using Mobaxterm on the PC, I selected a new SSH session on on that IP address.The OP5+ appeared and I selected user “root”.
As I opened the session I was asked for the password – the default for Armbian is 1234 – that got me in immediately at which point the sytem insisted I enter and verify a new password – I did that.And I was in.As Advanced IP Scanner showed me the IP address of the OP5+ and it’s MAC address, I took the opportunity to fix the address in my router – most routers offer this facility under various titles.
I figured I should get this out of the way.After picking a nice IP address on my system (down near the bottom outside of DHCP range – 192.168.1.21) and having saved that in my router, I ran REBOOT on the RPI5+ and a minute later went back to Mobaxterm to make a new session at that address with root user and the new password.Perfect.
As I sit here, having turned the OP5+ off last night – at which point only the red light was running (constantly) I’ve turned the OP5+ on gain and that flashing blue light is on – no idea why.However the OP5+ is working perfectly – I’ll get into that in a minute.I should take this opportunity to say that the board is running with only a VERY slightly warm processor – no heatsink.
My room is 22-23c.Back to yesterday.Having gotten the RPI5+ up and running with it’s fixed IP, it was time to mess with settings using armbian-config – except that this was not installed by default.
A simple apt install armbian-config fixed that.But first I missed out the bit where I was asked to select my default language and timezone.My language is English – thankfully the default and my timezone is mainland Spain.
Simple.The basic RPi5+ does not come with the WiFi adaptor – no doubt essential (WiFi6) for some but for me, I planned to test the RPI5+ for home control using Node-Red and I tend to prefer Ethernet for such controllers.You can buy an eMMC module for the RPi5+ as well as the WiFi module but these are beyond my needs for now.
Despite years of scare stories about SDs I’ve found them to be reliable (especially Sandisk and Samsung) – I’m not doing a lot of heavy database stuff but I do run my main RPi5 (and before that it’s predecessor RPi4 and so on back to RPi2) 24/7.Maybe my use of decent power supplies helps along with using the Linux (or at least Debian) “shutdown now” command to turn off my boards.Back to the OP5+ – it will run a range of operating systems including Android and indeed looks well suited with it’s 16GB of RAM and triple HDMI outputs to use as a media system.
The board also supports SSDs via USB3, but because RPi-Clone won’t (yet) work on this board due to an extra partition not present on RPi setups, I’ve not yet done anything with my SSD which is currently plugged in and appears at the SSH command line using my “partitions” alias – stored in /etc/bash.bashrc as an easy way to use “cat /proc/partitions”.So, on the OP5+ I see: 1 0 4096 ram0 254 0 8047728 zram0 31 0 16384 mtdblock0 179 0 31260672 mmcblk1 179 1 262144 mmcblk1p1 179 2 30654464 mmcblk1p2 8 0 117220822 sda 8 1 524288 sda1 8 2 116692438 sda2 254 1 51200 zram1 Ram0 and zram1 here are not relevant.In a Debian RPi system I’d see mmcblk1 (the SD) with it’s two partitions – boot and the main partition.
I’d also see (as above) sda (the SSD I plugged in) with it’s two partitions which mirror those of the SD.The sda partitions are there as I’ve already used that SSD with rpi-clone on my RPi.Sadly, the Orange Pi uses an extra partition, mtdblock0 which makes the immensely useful RPiClone fail (can’t find boot partition).
A quick comment here.Although Docker makes it easy to transfer complete packages from one computer to another, as I’ve recently discovered thanks to the help of my pal Andonio Fragola in Italy (more on that elsewhere), in the event of a complete melt-down, without RPiClone, it is still necessary to reconstruct the operating system and reinstall Docker, Docker-compose and other tools before simply installing directory structures which in which Docker stores your setups – in my case Node-Red, Mosquitto, Zigbee2MQTT and others – all self-contained including config and any data – and ready to recommence work.To attempt progress with RPi-Clone on the OP5+, I’m writing to Jeff Geerling right now – this is the gentleman who resurrected RPiClone once it failed with the introduction of Bookworm on the RPi now that the original RPiClone author seems to have disappeared off the map (I only know him as BillW2).
Fingers crossed but I’m not TOO hopeful.If this article sounds like a follow up to my Transition to Docker article – in a way it is, if I can get RPi-clones working this could well replace the RPi5 as it seems to be running cooler while begin powerful etc… Some time ago I put together a Python script for the RPI4/5 called CLS which shows useful data when used – and apart from one item it has transitioned to the OPi5+ no problem… So firstly, RPi5 with big heatsink: Secondly OP5+ with no heatsink – note I had to remove the RPi-specific power status command as that info is not similar on the two devices.Compare the temperatures… I tried bringing Linux up to the same release on the OP5+ as the RPi5, but Armbian-config said it is not available for now.
I refer to Docker above.Once I had the OP5+ running with Docker installed, I simply ran Antonio’s DockerIOT script to put a basic Node-Red and MQTT onto the OP5+ Then I ran and SCP command as user root – to copy the entire Docker installation for Node-Red over to the OPI5+ from my working RPI5 installation.scp -r /root/DockerIOT/nodered/data [email protected]:/root/DockerIOT/nodered chown -R 1000:1000 data What does that all mean? Well, on the RPI5, folder called /root/DockerIOT/nodered contains Antonio’s Docker-compose file which then creates a working Node-Red in a subfolder called data.
Thats all fine but I have vast amounts of node-red code on my RPI5 which we imported the hard way from the old RPi4 which did not have Docker but was installed on RPi2 and gradually upgraded over the years.That data folder contains the lot and it seems that all that is needed is to copy that over to a new machine after stopping the instance of node-red with docker-compose down, copying the contents of the data folder from RPi4 to OP5+ and ensuring ownership is correct – hence the two commands above – ran in the /root/DockerIOT/node-red folder on the RPi4 (192.168.1.21).After starting that SCP command I was asked for the password for OP5+ (same as RPI5) at which point I complied and copying started automatically with no intervention needed.
Before applying docker-compose up -d to the OP5+ – again in the node-red folder, I opened up an editor and replaced, in the node-red/data folder, all references to 192.168.1.20 with 192.168.1.21 – a simple operation.And that’s that – a perfect copy of my Node-Red installation.IF we can get somewhere with RPi-clone I could be employing that today (I need to similarly add in Zigbee2MQTT but that’ll wait).
Now then – why is that blue/green light still flashing?
At some point soon I’ll also take a look at the other options on the Armbian site specifically for this board;
Bookworm with various desktopsJammy with various desktopsand lets not forget Orange Pi’s own offerings – Orange Pi OS, Arch Linux, Droid…..


