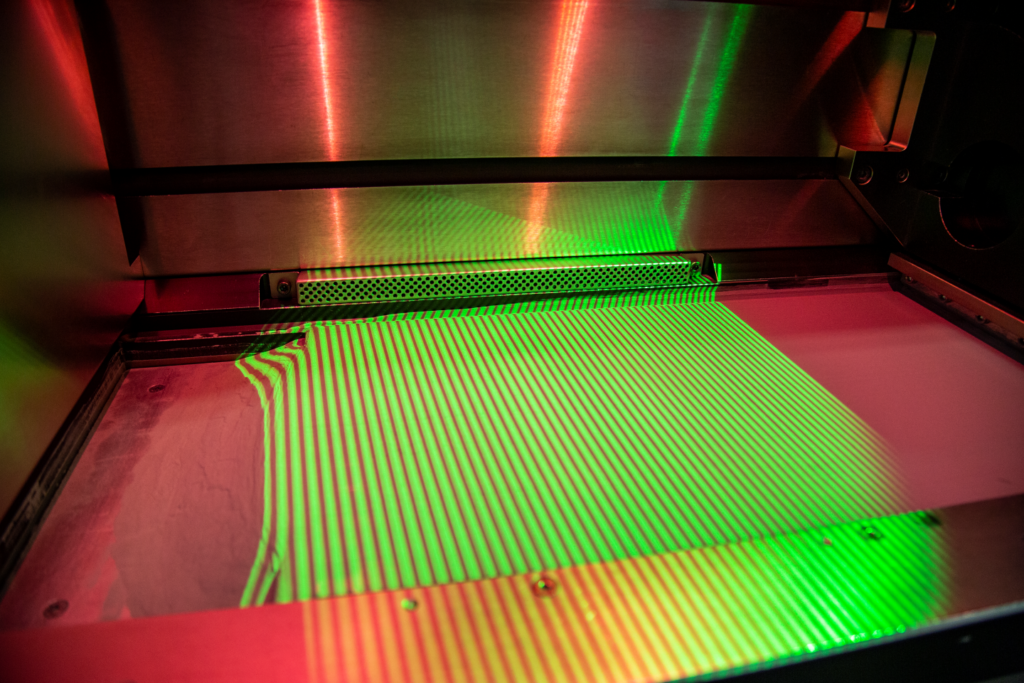
Additive Manufacturing (AM) is no longer judged by its printing capabilities, but how it can print reliably, repeatedly, at scale.As metal AM continues its transition from prototyping to production, manufacturers face a familiar industrial challenge: how does the industry ensure consistent quality without relying on costly, time-consuming post-process inspection, can we trust the process while it is happening? Phase3D was founded to answer these questions.Rather than adding another camera or subjective signal to an already noisy data stack, the company focuses on providing calibrated, repeatable height-based measurements of the additive process.
As a technical constraint: collect data that manufacturers can reliably use to make production decisions.Why Monitoring Alone is Not Enough Most metal powder bed fusion (PBF) systems today rely on some combination of optical imaging, infrared cameras, photodiodes, or AI-assisted anomaly detection.These tools provide useful visibility, but they are fundamentally subjective and uncalibrated, relying on blackbox AI systems.
In traditional manufacturing, quality decisions are never made from subjective monitoring alone.Machined parts are verified with calipers, CMMs, and gauges, all tools that produce traceable, unit-based data.AM, by contrast, has spent years attempting to infer quality from relative signals that vary from machine to machine and build to build.
As AM programs scale, this gap becomes a business risk.Post-process inspection can account for more than half the cost of a qualified metal AM part, and in some cases it becomes physically impossible such as large aerospace components.The industry does not need more monitoring; it needs in-process inspection that enables earlier decisions and fewer surprises downstream.
Measuring the Process, Not Monitoring Figure 1: Fringe Inspection measurement of the powder spreading layer on the EOS M 290 L-PBF machine.Phase3D’s core product, Fringe Inspection, applies structured light metrology to AM.Instead of estimating process health indirectly, it directly measures the three-dimensional surface profile of every layer (melted surface and powder spread) during a build.
For laser powder bed fusion, this results in quantitative measurements of powder layer uniformity, melted surface topology, and true layer thickness.Because these measurements are calibrated and unit-based, they can be compared across machines, materials, and facilities, providing an essential requirement for industrial qualification and process control.Spatter Detection: An Example of Inspection in Action Spatter (ejected molten or partially molten material during laser melting) has long been recognized as a primary contributor to surface roughness and porosity, causing failed builds.
Despite its known impact, spatter has been notoriously difficult to quantify in-process.Using Fringe Inspection, Phase3D and the University of Louisville Additive Manufacturing Institute of Science and Technology (AMIST) approached spatter as a measurable surface phenomenon rather than a visual artifact.By capturing metrology-grade heightmaps of every layer, the system objectively quantified spatter particles, surface roughness, and their spatial distribution across the build area.
Figure 2: Real time measurement of spatter correlates with part porosity Using 17-4PH stainless steel coupons, printed on an EOS M 290, data showed regions with higher measured surface roughness and spatter counts consistently exhibited higher porosity, while smoother regions produced denser parts.This result demonstrates a direct, quantitative link between in-process surface measurements and final part quality.Business Impact: Higher Confidence, Lower Cost Economically, the implications of real-time inspection and qualification are significant.
Manufacturers gain the ability to identify poor quality regions (like spatter) immediately instead of discovering defects after post-print inspection.Additionally, moving to an in-process method of part qualification reduces the need for expensive post-prints inspections such as coupon density, x-ray CT, and destructive performance testing.Conservative estimates of the US and EU market for qualification were approximately $3.3B in 2025, escalating to over $7.8B by 2030, as production for critical industries ramps.
A recent publication from the Joint EASA-FAA Additive Manufacturing Workshop 2025 highlights the need for real-time, high fidelity in-situ inspection methods for qualification.Figure 3: survey results from the Joint EASA-FAA Additive Manufacturing Workshop 2025 describing desired in-situ inspection methodology.Ultimately, objective inspection enables the creation of clear go/no-go criteria based on quantified thresholds tied to known defect risk.
Instead of relying on intuition, operators can make decisions grounded in data.Enabling Real-Time Control and Qualification With calibrated surface data available layer by layer, manufacturers can begin implementing closed-loop strategies—adjusting powder spreading, modifying laser behavior, or flagging localized risk zones automatically.This approach aligns naturally with IQ, OQ, and PQ frameworks and supports emerging standards such as SAE 7032, NASA-STD-6033/6035.
When anomalies that matter are measured and controlled, qualification becomes a continuous process rather than a costly final hurdle.Why This Matters Now As AM strategies mature, competitive advantage will be defined by who can manufacture with confidence at scale.Objective inspection transforms AM from a monitored process into a controlled one.
Spatter detection is just one example, but it illustrates a broader shift: when the process is measured, quality becomes predictable.And when quality is predictable, AM becomes truly industrial.For more on how inspection is shaping the future of AM production, visit phase-3d.com.
Phase3D is participating in Additive Manufacturing Strategies (AMS), a three-day industry event taking place February 24–26 in New York City.Ben Ferrar, Chairman of the Board and Chief Operating Officer, will moderate a panel about “The Future of Metal Parts for Aerospace & Defense” on February 25th.Registration for the event is open via the AMS website.
Subscribe to Our Email Newsletter Stay up-to-date on all the latest news from the 3D printing industry and receive information and offers from third party vendors.Print Services Upload your 3D Models and get them printed quickly and efficiently.Powered by FacFox Powered by 3D Systems Powered by Craftcloud Powered by Xometry 3DPrinting Business Directory 3DPrinting Business Directory
Read More


