If you've spent any time with Python, you've probably used it for data work, scripting, or maybe some automation—but image editing likely wasn't on your radar.It turns out Python can handle a surprising amount of what Photoshop does, and with way less code than you'd expect.This includes resizing or cropping, removing backgrounds, or even animating a still image into a GIF.
Here are seven ways I use Python to edit and animate images.I'm also sharing the code snippets to help you get started.Most of the examples here use a library called Pillow, which is the go-to Python library for image work.
A couple of sections use NumPy and rembg, and I'll explain those when we get there.Run this command in the terminal to install the necessary libraries: pip install Pillow numpy rembg Related I install these 9 Python tools on every new machine These are my go-to libraries for Python data crunching.Posts 3 By David Delony Using Python to resize, crop, and rotate an image The three basic operations every image editor must do These are the most basic things you can do to an image, and the Pillow library makes them almost embarrassingly simple.
All you need to do is import the Image module and write two lines of code, and you’re done.Here’s a basic idea of how that looks in code: from PIL import Image # Import the Image module from the Pillow library img = Image.open("photo.jpg") # Load photo.jpg from disk into an Image object (original is untouched in memory) # --- RESIZE --- resized = img.resize((800, 600)) # Create a new Image object scaled to 800x600px (non-destructive, img is unchanged) resized.save("resized.jpg") # Write the resized image to disk as resized.jpg # --- CROP --- cropped = img.crop((100, 100, 500, 400)) # Cut a rectangle from img: starts at (100,100), ends at (500,400) → gives a 400x300px image cropped.save("cropped.jpg") # Write the cropped image to disk as cropped.jpg # --- ROTATE --- rotated = img.rotate(45) # Create a new Image rotated 45° counter-clockwise; corners are clipped and filled black (canvas size unchanged) rotated.save("rotated.jpg") # Write the rotated image to disk as rotated.jpg Just replace "photo.jpg" with the path to any image you have on your computer.Automate The Boring Stuff with Python $30 $60 Save $30 Author Al Sweigart Genre Programming Title Automate The Boring Stuff with Python Automate the Boring Stuff with Python by Al Sweigart is a beginner-friendly guide to using Python for real-world task automation.
It teaches you how to write scripts that handle repetitive work like renaming files, scraping websites, filling out forms, sending emails, manipulating spreadsheets, and more.You don't need to have any prior coding experience.$30 at Amazon Expand Collapse Using Python to draw text and shapes on an image Programmatically annotate your images Pillow has a module called ImageDraw that essentially turns your image into a canvas.
You can paint text, rectangles, circles, lines—anything—directly on top of the existing pixels, at whatever position you specify.from PIL import Image, ImageDraw, ImageFont # Also import ImageFont to load a proper font img = Image.open("photo.jpg") draw = ImageDraw.Draw(img) # Draw object bound directly to img — modifications are in-place # Draw a red rectangle draw.rectangle([50, 50, 300, 150], outline="red", width=3) # Rectangle from (50,50) to (300,150), red border, 3px thick # Load a proper font (change path/size to suit your needs) font = ImageFont.truetype("arial.ttf", size=32) # Load a TTF font at 32px — use any .ttf file available on your system # Add white text at position (60, 60) draw.text((60, 60), "Hello, World!", fill="white", font=font) # Write text using the loaded font img.save("annotated.jpg") The ImageDraw.Draw(img) line is what links the drawing tool to your image.After that, every draw.rectangle() or draw.text() call is literally writing new pixel values onto the image at those coordinates.
When you save, those changes are baked in.If you don’t see any text, it can be because the “arial.ttf” font isn’t loaded on your system.Replace that with any font you have on your system and it should work.
Using Python to manipulate pixels directly Makes you remember that an image is just a grid of 1s and 0s This one requires a small mental shift.An image you see on your computer is just a grid of numbers.Every pixel has three values: one for red, one for green, and one for blue, each between 0 and 255.
A completely red pixel is [255, 0, 0], a white pixel is [255, 255, 255], and black is [0, 0, 0].Now the NumPy library lets you load an image as a three-dimensional array—height × width × color channels—and do math directly on those numbers.Here's a simple example where you invert the colors of an image by subtracting every pixel value from 255.
from PIL import Image # Import Pillow's Image module for loading and saving images import numpy as np # Import NumPy — allows treating the image as a grid of numbers for direct pixel math img = Image.open("photo.jpg") # Load photo.jpg from disk into an Image object pixels = np.array(img) # Convert the Image object into a NumPy array — each pixel becomes a number (0–255) representing its brightness/color value # --- INVERT --- inverted = 255 - pixels # Subtract every pixel value from 255 — this flips the colors (0 becomes 255, 255 becomes 0, etc.) result = Image.fromarray(inverted.astype(np.uint8)) # Convert the NumPy array back into a Pillow Image object — astype(np.uint8) ensures values stay in the valid 0–255 range result.save("inverted.jpg") # Write the inverted image to disk Once you think of images as just 0s and 1s, a lot of image editing options open up—color tinting, brightness adjustments, thresholding to black and white.At the end of the day, they're all just math on a grid of numbers.Related Why NumPy is the Foundation of Python Data Analysis NumPy turbocharges stats calculations.
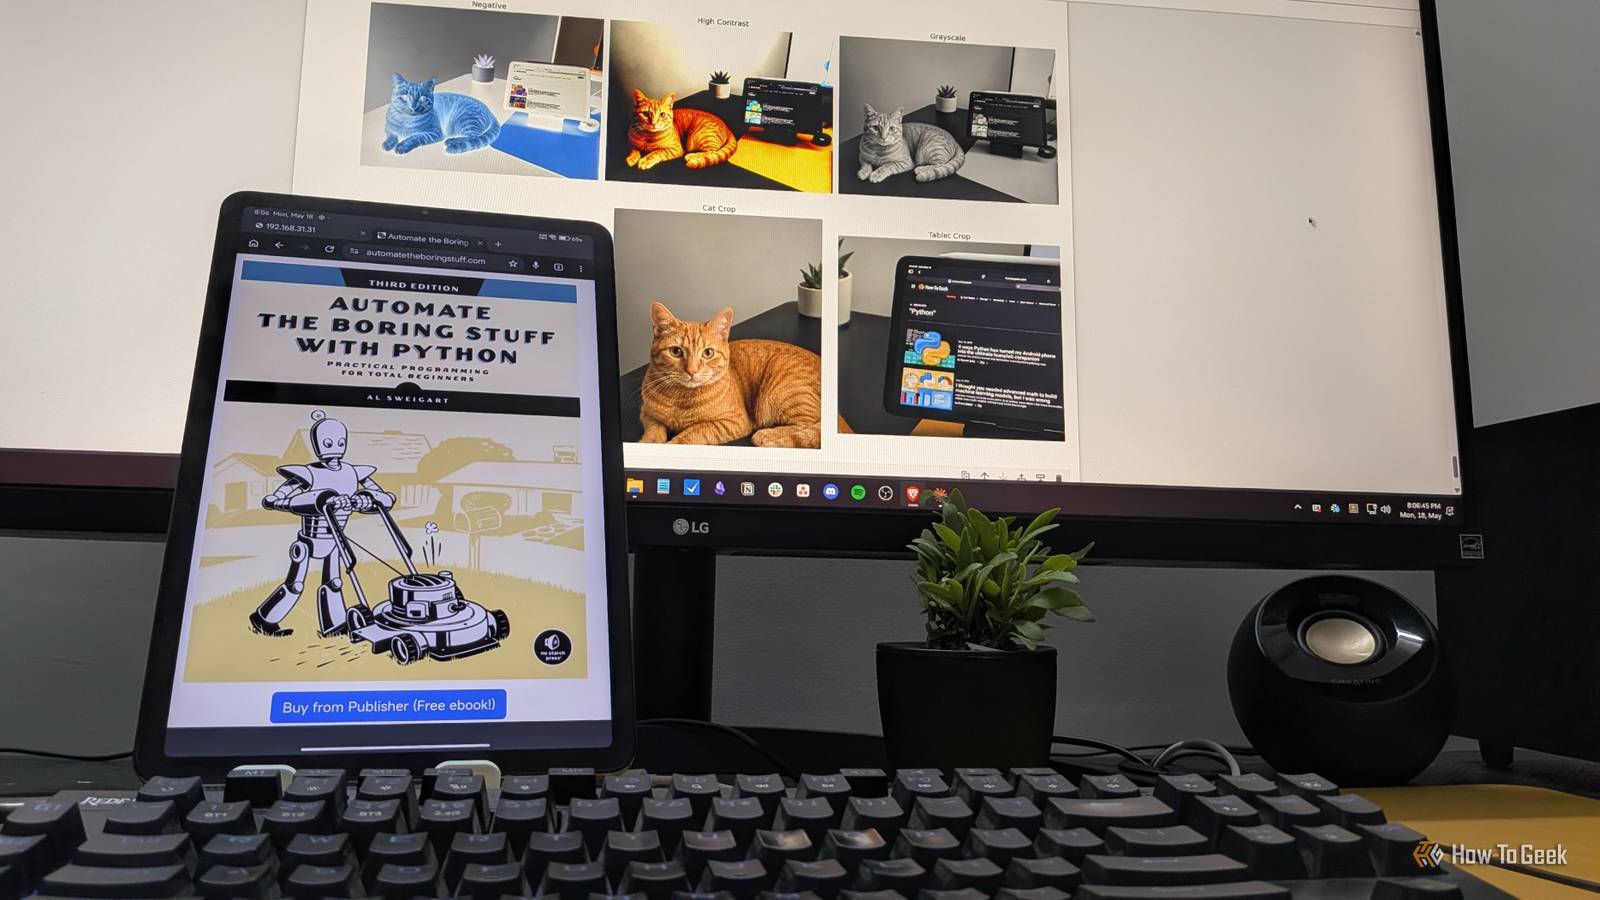
Posts By David Delony Using Python to apply filters and color adjustments This is where it starts to feel like photo editing This is where things start to feel a bit more like actual photo editing.Pillow lets you apply blur, sharpen, and grayscale conversions, plus adjust brightness and contrast—all through two modules: ImageFilter and ImageEnhance.You can do all of this without needing NumPy and manually altering the pixels.
Here’s a basic overview of how it works: When you blur an image, each pixel's value gets replaced with an average of the pixels around it.This makes everything look soft and blurry.Sharpening has the opposite effect.
It amplifies the contrast between neighboring pixels.Similarly, grayscale strips out the color channels (red, green, blue) and collapses them into a single luminance value—how bright each point is, with no color information left.from PIL import Image, ImageFilter, ImageEnhance # Import Image for loading, ImageFilter for blur/sharpen effects, ImageEnhance for brightness/contrast adjustments img = Image.open("photo.jpg") # Load photo.jpg from disk into an Image object (original stays unchanged throughout) # --- GRAYSCALE --- gray = img.convert("L") # Convert img to grayscale — "L" is Pillow's mode for 8-bit black & white; returns a new Image object gray.save("grayscale.jpg") # Write the grayscale image to disk # --- BLUR --- blurred = img.filter(ImageFilter.BLUR) # Apply a simple box blur to img — returns a new Image object, img is unchanged blurred.save("blurred.jpg") # Write the blurred image to disk # --- SHARPEN --- sharpened = img.filter(ImageFilter.SHARPEN) # Apply a sharpening filter to img — enhances edges; returns a new Image object sharpened.save("sharpened.jpg") # Write the sharpened image to disk # --- BRIGHTNESS --- enhancer = ImageEnhance.Brightness(img) # Create a Brightness enhancer object bound to img — similar to ImageDraw, but read-only (non-destructive) bright = enhancer.enhance(1.5) # Apply 1.5x brightness (1.0 = original, <1.0 = darker, >1.0 = brighter) — returns a new Image object bright.save("brighter.jpg") # Write the brightened image to disk In the above code, each effect is applied to the original image independently, so you're not stacking the effects.
However, if you wanted to chain them, you'd just pass the output of one operation as the input of the next.Using Python to remove the background from an image It can giveth and it can taketh away This one is the odd one out in terms of how it works, because it's not pure geometry or math—it uses a small machine learning model under the hood.The library is called rembg, and it takes an image, figures out what the subject is versus the background, and returns a PNG with the background replaced by transparency.
The code is also the simplest in this entire article: from rembg import remove # Import the remove function from rembg — a third-party library that uses an AI model (U2Net) to detect and remove image backgrounds from PIL import Image # Import Pillow's Image module for loading and saving images input_image = Image.open("photo.jpg") # Load photo.jpg from disk into an Image object output_image = remove(input_image) # Pass the image through the AI model — detects the foreground subject, removes the background, returns a new Image object with a transparent background output_image.save("no_background.png") # Save as PNG — must use PNG (not JPG) because JPG doesn't support transparency; the transparent areas would be lost The rembg library downloads a pre-trained segmentation model the first time you run it (so the first run takes a moment), and after that it runs locally on your machine.The output is a PNG file with an alpha channel, meaning the background is fully transparent—you can drop it into any design tool or composite it with another image using the method from the previous section.It works best on images with a clear subject and a reasonably distinct background.
Photos of people, objects, or animals tend to come out well.However, very busy backgrounds or images where the subject blends into the surroundings can trip it up.You might notice errors here, usually because “onnxruntime” isn’t installed.
While rembg installs it automatically, if it doesn’t, just run pip install onnxruntime and that should fix the error.Related Stop trusting online tools with your photos—build this Python background remover instead Your own tool means you're in full control of your images.Posts By Zunaid Ali Using Python to composite two images together This is how you use layers using code Compositing means placing one image on top of another.
Think of it like layers in Photoshop—you have a background, and you paste something on top of it at a specific position.Pillow handles this with the paste() method.If your overlay image has transparency (a PNG with an alpha channel), you can pass it as a mask, so the transparent areas don't overwrite the background.
This is the foundation for things like watermarking, picture-in-picture, and UI mock-up generation.from PIL import Image background = Image.open("photo.jpg").convert("RGBA") # Convert to RGBA to support transparency overlay = Image.open("logo.png").convert("RGBA") # Convert to RGBA — logos often have transparent areas # Resize overlay to desired size before pasting overlay = overlay.resize((200, 100)) # Scale the logo to 200x100px — adjust to suit your needs # Paste the overlay at position (50, 50) background.paste(overlay, (50, 50), mask=overlay) # mask=overlay uses the overlay's alpha channel to blend edges cleanly — without this, transparent areas paste as black background.save("composited.png") # Save as PNG to preserve transparency The paste() method has an an argument mask=.This tells Pillow to use the alpha channel of the overlay image to decide which pixels to paste and which to leave transparent.
Without it, you'd get a hard rectangular paste with no transparency.Using Python to animate a single image into a GIF It’s ALIVE… Technically, you can’t use Python to animate an image, in the sense that the cat sits up and starts moving around.That’s not possible.
However, what is possible is that you can add zoom-in effects or make one image slowly transition into another.Python can generate a bunch of frames in code by applying tiny incremental changes to the image, then stitch all those frames together into a single GIF file.Here's an example that creates a slow zoom-in effect: each frame resizes the image slightly larger, then crops back to the original dimensions from the center, so it looks like the camera is pushing in.
from PIL import Image img = Image.open("photo.jpg").convert("RGBA") # Load image and convert to RGBA — needed for consistent pixel handling across frames frames = [] # Empty list to store each frame of the animation for i in range(20): # Loop 20 times — each iteration generates one frame of the zoom effect scale = 1 + i * 0.02 # Calculate scale factor for this frame — starts at 1.0 (100%), increases by 2% each frame up to 1.38 (138%) new_width = int(img.width * scale) # Calculate new width based on scale factor new_height = int(img.height * scale) # Calculate new height based on scale factor resized = img.resize((new_width, new_height)) # Resize the image to the new dimensions — makes it slightly larger each frame # --- CROP BACK TO ORIGINAL SIZE FROM CENTER --- left = (resized.width - img.width) // 2 # Calculate how many pixels to trim from the left to center the crop top = (resized.height - img.height) // 2 # Calculate how many pixels to trim from the top to center the crop frame = resized.crop((left, top, left + img.width, top + img.height)) # Crop the resized image back to the original dimensions from the center — this creates the zoom-in illusion frames.append(frame) # Add the cropped frame to the frames list # --- SAVE AS GIF --- frames[0].save( "zoom.gif", # Output filename save_all=True, # Tell Pillow to save all frames, not just the first one append_images=frames[1:], # Attach frames 2–20 after the first frame duration=50, # Each frame displays for 50 milliseconds — lower = faster animation loop=0 # 0 = loop forever; set to 1 for play-once, 2 for twice, etc.) The loop generates 20 frames, each zoomed in 2% more than the last.Then save() with save_all=True tells Pillow to pack all of them into a single animated GIF.
The same principle works for panning, fading, color cycling—any effect you can express as a series of small changes per frame.I should also mention that if you had a burst shot of your cat moving, then yes, you could technically stitch together each of those shots using Python to create an almost stop-motion animation of your cat moving around.Related How to Use Stable Diffusion to Make AI GIFs and Videos You won't win any Oscars, but you can make some Animorphs! Posts By Jordan Gloor Python opens up insane possibilities So, as you can see, image editing with code is actually possible, and what’s more, it really isn’t that complicated or code-heavy.
But, why would you use this instead of Photoshop? Well, being able to manipulate images using code opens up a lot of automation potential.For example, I recently created an automation where my wallpaper image would have an overlay of my daily tasks.It was a cool project and wouldn’t be possible without programmatic image manipulation.
Related I let Claude change my desktop wallpaper—and now I never miss a deadline (Prompt included) I outsourced my productivity anxiety to my wallpaper, and honestly, it's going great.Posts 2 By Dibakar Ghosh
Read More