My home server runs more than a dozen services I use regularly for work and for my personal life.Wake-on-LAN is great when it works, but it isn't foolproof.Sometimes a BIOS update breaks your settings, the network card gets put to sleep, or the PC is completely offline.
When WOL fails, someone has to physically push the power button on the PC.If I'm away from home, that can be a problem.That is why I started working on an alternative using an ESP32 board that interfaces directly with the motherboard's power header.
How the ESP32 power button pusher works GPIO to a header Your PC's power button isn't especially complicated.It is just a momentary switch that connects two pins on the front panel header.If you really want, you could turn your PC on by jumping those two pins using a screwdriver (but you shouldn't).
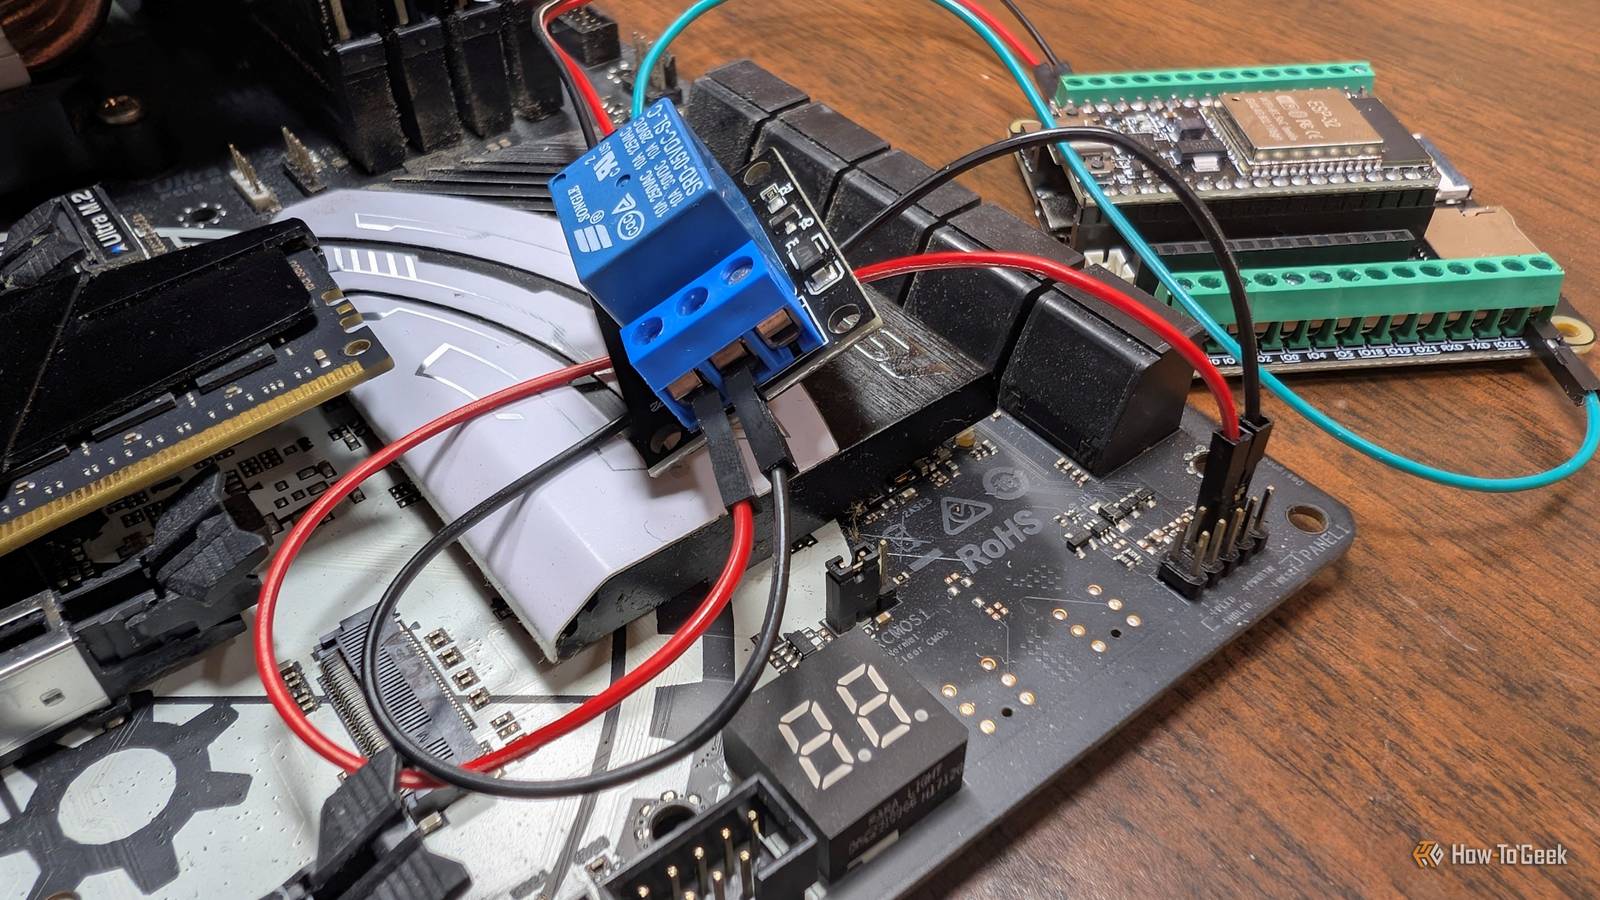
Related What’s the RGB Header on My Motherboard for? Don't try to plug your fans in there! Posts By Ismar Hrnjicevic The ESP32 power button pusher works by replicating that function, except instead of mechanically pushing the button, the GPIO on the ESP32 "presses" it electrically.All you need are a few common parts and an optocoupler (ideally) or a relay.Once the device is physically connected to my PC, the ESP32 connects to my Wi-Fi.
From there, I can trigger a button "press" via a digital interface, like Home Assistant or even a webpage.ESPHome makes this project very simple.Though I haven't implemented it yet, I'm going to wire up a GPIO pin to the LED header too.
That way, the ESP32 board will receive an input that can tell me whether the PC actually powered on successfully rather than leaving me to it worked correctly.My ESP32 board will be powered by a battery backup, though you could power it via a spare USB header if you wanted to keep things tidy.ESP32 beats Wake-on-LAN (WOL) I've never had good luck with WOL Every PC I've ever owned has been a little weird about its network adapters.
Sometimes they get disabled by a fast startup setting, other times they wind up inappropriately deep sleeping when I don't want them to.Wake-on-LAN (WOL) is also not an option if the PC in question had a hard power loss, like a power —a problem that comes up fairly frequently for me.Whatever the specific circumstances, I don't fully trust WOL to work when I need it.
Simulating a physical button press circumvents those issues completely.It also allows me to do a few things that WoL can't, like force a shutdown by "long pressing" the button.My ESP32 will run off a battery that will keep it active during brownouts and short outages, but it isn't strictly necessary.
Any good power supply that works with your ESP32 will be adequate.Building the ESP32 button pusher Your shopping list is short Close To get started, there are several things you'll need: An ESP32 dev board An optocoupler or a relay A few resistors (which may be applicable, depending on your setup) Wires A breadboard (for prototyping) I don't have an optocoupler available at the moment, so I'm using a relay.That isn't a problem, and it is audibly clicky—something I actually enjoy.
I also used a breakout board; it isn't necessary, but it does make it a little easier.The output of the ESP32 needs to connect to the relay so that you can control it.My specific relay calls for power, a switch, and a ground.
The output has Normally Closed (NC), Normally Open (NO), and Common (COM).In my case, I want the relay to be normally open, which means power is only applied to the motherboard pin when the relay itself receives a signal.So, I attached wires to COM and NO.
If you accidentally connect to NC instead of NO, you'll find that your motherboard behaves like someone is constantly holding the power button.If you have a multimeter handy, NC and COM will have near zero resistance or beep if you use the continuity check mode.NO and COM will not.
Once that was done, I needed to flash the board using the code I cajoled Claude into producing.It has one switch function, which is a 300ms press to turn the PC on, and a second 5500ms hold to force the PC to shut down.With the firmware flashed, the only thing to do was to power up the ESP32, connect it to an old motherboard to test it, and verify that everything worked correctly.
# pc-power.yaml — ESPHome firmware # Battery-powered ESP32 + 1-channel relay module across the motherboard PWR_SW header.# Strategy: deep sleep at ~10 uA, wake every ${sleep_duration}, check an MQTT retained # command, execute it, clear it, go back to sleep.# # Commands (publish RETAINED so the device finds them on next wake): # topic pc-power/cmd payload "press" -> 300 ms tap (boot / graceful shutdown) # topic pc-power/cmd payload "force_off" -> 5.5 s hold (hard power-off) # topic pc-power/hold payload "ON" -> stay awake (for OTA flashing) # topic pc-power/hold payload "OFF" -> resume sleeping substitutions: devname: pc-power relay_pin: GPIO23 sleep_duration: 45s # wake interval; worst-case command latency ~= this + boot time run_duration: 15s # awake window per wake; bump to 25s if commands get missed esphome: name: ${devname} friendly_name: PC Power Button esp32: board: esp32dev framework: type: esp-idf logger: baud_rate: 0 # UART logging off; saves power, logs still visible over MQTT wifi: ssid: !secret wifi_ssid password: !secret wifi_password fast_connect: true # skip the AP scan on wake — meaningful battery savings power_save_mode: HIGH ota: - platform: esphome password: !secret ota_password mqtt: broker: !secret mqtt_broker username: !secret mqtt_username password: !secret mqtt_password discovery: false birth_message: topic: ${devname}/status payload: awake will_message: topic: ${devname}/status payload: asleep on_message: # ---- normal press: boots the PC, or asks a running OS to shut down ---- - topic: ${devname}/cmd payload: press then: - deep_sleep.prevent: sleep_ctl - switch.turn_on: relay - delay: 300ms - switch.turn_off: relay - mqtt.publish: # consume the command so it can't re-fire topic: ${devname}/cmd payload: "" retain: true - mqtt.publish: topic: ${devname}/ack payload: press-done - delay: 500ms # let the publishes flush before sleeping - deep_sleep.enter: sleep_ctl # ---- force off: hold 5.5 s, same as holding the physical button ---- - topic: ${devname}/cmd payload: force_off then: - deep_sleep.prevent: sleep_ctl - switch.turn_on: relay - delay: 5500ms - switch.turn_off: relay - mqtt.publish: topic: ${devname}/cmd payload: "" retain: true - mqtt.publish: topic: ${devname}/ack payload: force-off-done - delay: 500ms - deep_sleep.enter: sleep_ctl # ---- maintenance hold: keep awake so you can OTA-flash it ---- - topic: ${devname}/hold payload: "ON" then: - deep_sleep.prevent: sleep_ctl - topic: ${devname}/hold payload: "OFF" then: - deep_sleep.enter: sleep_ctl deep_sleep: id: sleep_ctl run_duration: ${run_duration} sleep_duration: ${sleep_duration} switch: - platform: gpio id: relay name: Power button relay pin: number: ${relay_pin} # inverted: true # UNCOMMENT if your relay module is ACTIVE-LOW # (relay clicks when IN is grounded).
Test before # wiring to the header! restore_mode: ALWAYS_OFF internal: true # hide the raw relay; expose only the button below # Convenience button — only usable while the device is awake (e.g.hold mode) button: - platform: template name: Press power button on_press: - switch.turn_on: relay - delay: 300ms - switch.turn_off: relay # ---- optional: battery voltage reporting ---- # Wire battery+ through a 100k/100k divider to GPIO34, then uncomment: # sensor: # - platform: adc # pin: GPIO34 # name: Battery voltage # attenuation: 12db # update_interval: 10s # filters: # - multiply: 2.0 The final step, which I have yet to complete, is integrating the entire thing into my Home Assistant setup.Eventually, I'll just be able to press a button on my phone to turn my server PC on and off.
ESP32 is a cheap, reliable way to control your PC For less than $20 in parts and about 45 minutes of tinkering, you can create a setup that will work more reliably than Wake-on-LAN and give you more control.If you want to expand the functionality, you can read output from the power LED pins to determine the PC's state or wire up another relay (or a single, more complex relay) to the restart pins.If you don't have an ESP32 board handy, don't worry—it isn't strictly necessary.
A Pi Pico W or a Pico 2 W will work just as well for this project, but your code and pin outs will be a little different.
Read More