Ever since I spun up my first home server using an old laptop, I've been relying on it more and more.I've added numerous services over the months, and I've now reached the point where I depend on the server running 24/7 to keep everything accessible, but the brutal summer heat has made that increasingly difficult, prompting me to try some DIY cooling solutions.My first cooling fix worked, but it was way too noisy A cooling fix that came at a cost I started noticing that my server was overheating because services like Jellyfin and Immich just refused to work on my phone.
Even something as simple as opening one of the NAS folders through my PC would cause the interface to hang for several minutes.The laptop's shell would get too hot to touch, so I immediately suspected overheating was the cause, rather than something else.This started happening more and more with each passing day as summer got progressively hotter, and I knew something had to be done to keep my server operational.
So, I dusted off a small, USB-powered evaporative cooler, pointed it toward the laptop, and set it to fan-only mode.This worked surprisingly well at keeping my DIY server cool.I didn't test the temperatures, but the laptop was never hot to the touch anymore, and my self-hosted apps worked whenever I needed them.
The only problem? The constant fan whine in the background was driving me crazy.It's actually surprisingly loud for such a small fan, although it wasn't exactly designed with PC use in mind.My wife works in the kitchen where the server is located, and she started complaining about the constant buzzing, so I knew this solution wasn't meant to last.
I couldn't install a better cooler, so I made the one I had bigger I had an idea Close My laptop-turned-server is actually a 2-in-1 model with all of its internals housed behind the display.Like most convertible laptops, its constrained design leaves even less room for effective cooling than a traditional laptop.I couldn't upgrade the cooling system the way you could just upgrade the cooler in a desktop PC, but I realized I could simply add more heatsinks to the existing one.
That would increase the total thermal mass and surface area available to dissipate heat, massively helping with the heat-soak issue caused by running the laptop 24/7.Instead of relying entirely on the tiny built-in fan to keep up with the accumulated heat, the added aluminum could absorb and spread some of it so that it could dissipate into the air.The screen was already broken anyway, so I decided to remove it permanently.
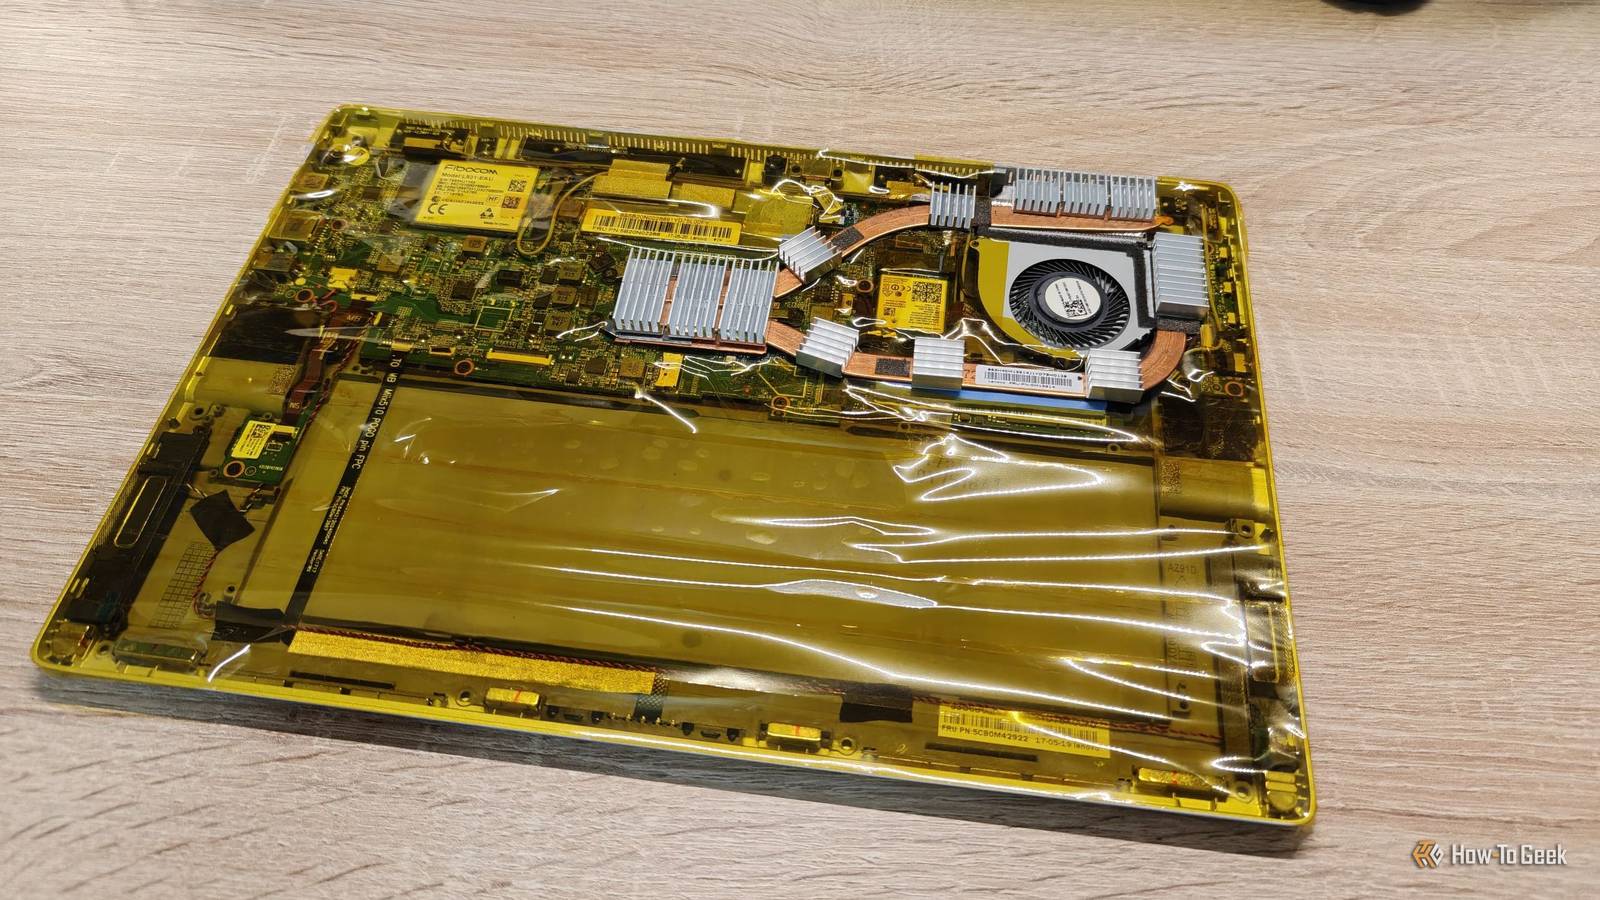
In its place, I installed 16 cheap mini aluminum heatsinks from Temu.These little heatsinks, popularly used in SBCs, have special thermally conductive double-sided adhesive on the back, allowing you to stick them to almost any heat-generating component.The idea came to me pretty randomly, but I later realized my colleague Will had been using a similar heatsink setup to keep his desktop RAM cool, which made me a little more confident that this ridiculous idea might actually work.
I focused most of the heatsinks on the area surrounding the fan, where the tiny original heatsink was already located.I also placed a few across the copper heat pipes, particularly around the NVMe and CPU.When I was done, I covered the entire laptop in Kapton tape, a special heat-resistant film often used in electronics.
I did this mostly to keep dust out of the components that don't generate heat.It also looks very cool.After booting the laptop up, the heatsinks were starting to get warm, which meant that my experiment was working.
However, I quickly realized that the VRMs next to the CPU were running hot (which is normal, but my laptop's cooling design didn't account for it), so I moved a couple of heatsinks over there to help keep them cool as well, which should help with overall system stability.My silly DIY heatsink hack dropped temperatures by 8°C The dumb idea worked better than I hoped To test my freshly upgraded laptop server, I ran a 10-minute stress test on the CPU and logged the temperature.I did one test before the experiment and one after, and when I put the data into a graph, the results shocked me.
The CPU was running several degrees cooler with the mini heatsinks installed.After removing the initial transient spikes and post-test temperatures from my testing data, I calculated the average temperature in the laptop's stock configuration to be 71°C, whereas the temp with the heatsinks installed was around 63°C.This meant the CPU was running a whole 8°C cooler, an impressive result for $3 worth of materials and 30 minutes of my time.
The most important thing, however, was that the laptop could now run 24/7 without the annoyingly noisy external fan.My self-hosted services are no longer refusing to respond, and the NAS isn't randomly freezing on me.Of course, I still kept that external fan around for times when I need to run something demanding, like Immich Machine Learning (the CPU package hovers around 65°C under that load), but for regular operations, the laptop stays pretty cool and quiet.
Turns out, you can solve a lot of issues with a little DIY When I first started this experiment, I wasn't expecting much.I thought it would be a temporary hack that might drop temperatures by 1–2°C under load, but wouldn't do much to fix the sustained temps.However, it worked way better than I could've hoped, and now I'm tempted to start slathering these inexpensive heatsinks all over my hot-running electronics! Related I built my entire home network out of e-waste, and it saved me hundreds One person's e-waste is another person's homelab.
Posts By Nick Lewis
Read More